AC Leaking Water Inside House: What It Means and How to Fix It
AC Leaking Water Inside House: Causes, Fixes, and When to Call for Help If you see your AC leaking water inside the house, you need to act fast. Even a slow...
In this article
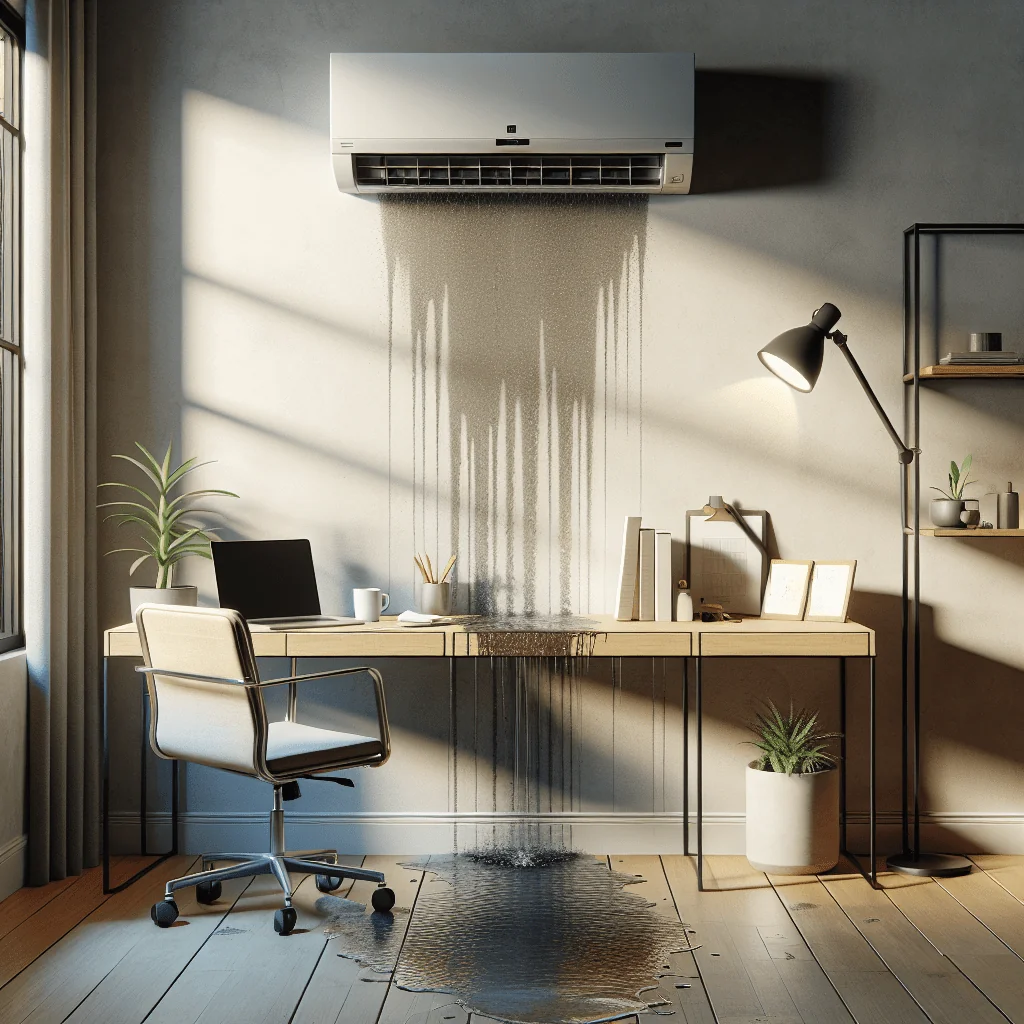
If you see your AC leaking water inside the house, you need to act fast. Even a slow drip can stain ceilings, damage flooring, and lead to mold. The good news is that many leaks come from a few common problems that you can check safely.
This guide explains why an air conditioner leaks indoors, how to do basic troubleshooting, and when to stop and call a professional. You will also find a quick DIY repair safety checklist to protect yourself and your home during any repair attempt.
How an AC Creates Condensation and Why Leaks Happen
An air conditioner does more than cool the air; it also removes moisture. Warm, humid air passes over the cold evaporator coil, and water condenses on the coil surface. That water is meant to drain away through a simple path.
Condensation, Drain Pans, and Drain Lines Explained
Under the indoor unit, a drain pan collects the water that drips off the coil. A condensate drain line then carries the water outside or to a plumbing drain. If anything blocks, cracks, or overflows in this path, you will see your AC leaking water inside the house.
Most leaks do not mean the AC is making “too much water.” The real issue is that the water cannot move through the drain system. Understanding this path helps you track down where the problem starts.
Common Reasons an AC Leaks Water Inside
Several issues can cause indoor water leaks. Some are simple to fix yourself, while others need a licensed technician. Knowing the likely causes helps you plan your next steps and avoid guesswork.
Typical AC Leak Causes You Should Know
Here are the most frequent reasons an indoor AC unit drips or spills water:
- Clogged condensate drain line – Dirt, algae, or sludge block the drain pipe.
- Full or damaged drain pan – The pan rusts, cracks, or overflows during heavy use.
- Frozen evaporator coil – Ice melts and overwhelms the pan, causing sudden leaks.
- Dirty air filter – Reduced airflow leads to coil icing and extra condensation.
- Incorrect unit installation – The indoor unit is not level, so water runs the wrong way.
- Low refrigerant level – The coil gets too cold and freezes, then leaks as ice melts.
- Poor insulation on the drain line – Moisture condenses on the outside of the pipe and drips.
Many leaks involve more than one of these issues at once, such as a dirty filter plus a clogged drain line. That is why a structured, step-by-step check is more effective than fixing one thing at random.
DIY Repair Safety Checklist Before You Touch the AC
Before you touch the air conditioner, think about safety. Water and electricity together can be risky, and some AC parts are sharp or delicate. A short safety checklist helps you avoid injury and extra damage.
DIY Repair Safety Checklist for Home AC Work
Use this simple DIY repair safety checklist whenever you work around an AC or other home systems:
- Turn off power to the AC at the thermostat and main switch or breaker.
- Keep hands and tools away from live electrical parts and exposed wires.
- Wear closed shoes and avoid standing in pooled water while working.
- Use a sturdy step stool or ladder if the unit is mounted high.
- Protect floors and furniture with towels or a plastic sheet before opening panels.
- Do not open sealed panels or refrigerant lines; leave those to professionals.
- Stop work if you smell burning, see sparks, or hear unusual electrical noise.
Once you have made the area safe and powered down the system, you can start checking for simple causes of the leak without putting yourself or your home at risk.
Step-by-Step: What to Do When You See Water Dripping
When you notice your AC leaking water inside the house, follow a clear process. These steps help limit damage and may solve the problem without a service call, as long as you stay within basic DIY tasks.
Ordered Steps to Stop an Indoor AC Leak
Work through these steps in order so you do not miss anything important:
- Shut off the AC and contain the water.
Turn the system off at the thermostat and, if possible, at the breaker. Place towels, a tray, or a bucket under the leak to protect flooring and drywall from more water. - Check the air filter and replace if dirty.
Open the return grille or filter slot and inspect the filter. If the filter looks dark, dusty, or clogged, replace it with a clean one of the same size and type. - Inspect the drain pan for standing water.
Remove the indoor unit’s access panel if you can do so safely. Look for a shallow metal or plastic pan under the coil. If the pan is full, carefully remove water with a cup, sponge, or wet/dry vacuum. - Clear a suspected clogged drain line.
Find the PVC drain pipe that exits the indoor unit. Many systems have a small access cap on a vertical section of this pipe. Remove the cap and use a wet/dry vacuum at the outdoor end of the line to pull out sludge, or gently flush with a small amount of warm water and mild soap. - Look for signs of a frozen coil.
Shine a light into the coil area. If you see ice or heavy frost, leave the system off and turn the fan to “On” to help melt the ice. Place extra towels to catch added water while the coil thaws. - Check that the unit is level.
Use a small level on the bottom edge of the indoor unit or the mounting bracket. The unit should tilt slightly toward the drain side. If the tilt is wrong or the unit has sagged, note this and call a professional for adjustment. - Restart and monitor for new leaks.
After clearing the drain and changing the filter, restore power and run the AC. Watch the drain line outlet outside and the indoor pan for at least 15–20 minutes. You should see a steady drip outside and no new water inside.
If the leak stops and the drain is flowing, you likely had a simple blockage or a filter issue. If water returns, you may have a deeper problem such as a damaged pan, low refrigerant, or an installation issue that needs expert attention.
Clogged Condensate Drain Line: The Most Common Culprit
A clogged condensate drain line is the leading cause of an AC leaking water inside the house. Dust, algae, and small debris build up inside the pipe and slow or block the flow. Water then backs up into the drain pan and overflows into your home.
How to Recognize and Clear a Drain Line Blockage
You may suspect a clog if the pan is full, the drain line outlet outside is dry, or you see sludge near the pipe. Many homeowners can clear a light clog using a wet/dry vacuum on the outside end of the line. Create a tight seal with a rag around the pipe and run the vacuum for a short burst to pull out debris.
If the clog returns often, you might need a deeper cleaning from a technician or a change to the drain design, such as adding a clean-out or improving the slope. Regular flushing during yearly service also helps keep the line clear.
Frozen Evaporator Coil and Dirty Filters
A frozen evaporator coil creates a different type of leak. As the coil ices over, airflow drops further, and more ice forms. When the system finally shuts off or you turn it off, all that ice melts at once and can overwhelm the drain pan.
Why Coils Freeze and How That Leads to Leaks
The drain pan cannot handle the sudden volume of water, so it spills into the unit and nearby ceiling or walls. A dirty air filter is a common trigger because it reduces airflow over the coil, but low refrigerant or blocked vents can also play a role.
If you suspect a frozen coil, always let the ice melt fully before restarting cooling. Running the AC with a frozen coil can damage the compressor and will not cool your home well. After thawing, replace the filter and monitor the system; if icing returns, schedule service.
Problems You Should Leave to a Professional
Some causes of indoor AC leaks are not safe or practical for DIY repair. In these cases, the best move is to shut the system down and schedule service. Trying to fix these issues without training can cause more damage or affect warranties.
Signs Your AC Leak Needs Expert Help
Call a licensed HVAC technician if you notice any of these signs:
- Repeated leaks even after clearing the drain and changing filters.
- Visible cracks, rust holes, or corrosion in the drain pan.
- Suspected low refrigerant (poor cooling, hissing noises, frequent icing).
- Water leaking from inside the air handler cabinet or electrical area.
- Moldy smell from vents that does not fade after cleaning the drain.
A professional can test refrigerant levels, inspect the coil, replace a damaged pan, and adjust the unit’s slope. These tasks need tools, gauges, and training that most homeowners do not have.
Preventing Future AC Leaks Inside Your Home
Once you stop the current leak, prevention becomes the next goal. Simple habits and routine maintenance greatly reduce the risk of water damage from your AC and keep the system running efficiently.
Simple Maintenance Habits That Reduce Leak Risk
Focus on these key prevention steps:
- Change or clean air filters on the schedule recommended by the manufacturer.
- Have the AC inspected and serviced by a professional at least once a year.
- Ask the technician to flush the condensate drain line during each visit.
- Keep the area around the indoor unit clean and free of dust and clutter.
- Check the drain line outlet outside during hot seasons to confirm steady dripping.
These small actions help your system run smoother, cool better, and keep water where it belongs: outside your house, not on your floors or ceiling. Regular care also helps catch small problems before they turn into major leaks.
When an AC Leak Points to Bigger Home Issues
Sometimes an AC leaking water inside the house reveals other problems. Persistent moisture can lead to mold growth, peeling paint, and warped wood. In multi-story homes, a slow leak from an attic unit might show up as ceiling stains in a different room.
Checking for Water Damage After the Leak
After fixing the AC, inspect nearby walls, ceilings, and flooring. Dry any wet areas fully with fans or a dehumidifier. If you see signs of mold or soft drywall, plan for a repair or replacement of the affected materials before the damage spreads.
Dealing with both the AC issue and any water damage early helps protect your health and your home’s structure. A quick response also cuts the chance of repeat problems in the same spot.
Quick Reference: AC Leak Causes, DIY Options, and When to Call
This comparison table gives a fast overview of common AC leak causes, what you can safely try yourself, and when professional help is the better choice.
| Leak Cause | Typical Signs | DIY Actions | Call a Professional When |
|---|---|---|---|
| Clogged drain line | Full pan, no drip outside, slow leak | Use wet/dry vacuum, gentle flushing | Clogs return often or line is hard to access |
| Dirty air filter | Poor airflow, dusty filter, possible icing | Replace filter, check vents are open | Leaks continue after filter changes |
| Frozen evaporator coil | Visible ice, weak cooling, large melt leak | Turn off cooling, run fan to thaw, change filter | Coil freezes again or you suspect low refrigerant |
| Damaged drain pan | Cracks, rust, water under unit | Temporary pan under unit to catch drips | Pan is cracked, rusted, or hard to reach |
| Improper unit slope | Water runs away from drain, uneven unit | Note the issue; do not try to rehang unit | Indoor unit needs leveling or bracket repair |
Use this table as a quick guide while you inspect your system. If you are unsure which cause fits your situation, or you feel unsafe at any point, shut the unit off and call a professional for a full inspection.